DNS CONFIGURATION IN LINUX UBUNTU -16.04.3-server
- Sankalpa H.T.S
- Jun 19, 2018
- 7 min read

Updated: Jun 20, 2018

We are going to configure Primary & Secondary DNS servers and through the client machine we’re going to browse the apache web server.
For the purpose of this article, we will assume the following:
• We have a primary DNS server “server” – 192.168.200.10
a secondary DNS server “server2” – 192.168.200.12
• Apache web server – 192.168.200.200
www.amaa.com
smallco.amaa.com
• A client machine “san” - 192.168.200.50
By the end of this document, we will have a primary DNS server ns1, and secondary DNS server ns2, which will serve as a backup.
Let’s get started by installing our Primary DNS server, ns1.
Configure Primary DNS server

Update the apt package cache by typing:

Now install BIND:

IPv4 Mode
Before continuing, let’s set BIND to IPv4 mode. On both servers, edit the bind9 systemd unit file by typing:

Add “-4” to the end of the ExecStart line.

Reload the systemd daemon to read the new configuration into the running system:

Restart BIND to implement changes:

Configure Options File
Open the named.conf.options file for editing:

It will looks like below:

Above the existing options block, create a new ACL block called “trusted”. This is where we will define list of clients that we will allow recursive DNS queries from (servers that are in same datacenter).
In here we will add primary DNS server, secondary DNS server and all clients in the 192.168.200.0/24 network. If we give specified IP addresses for clients then it will only allow recursive DNS queries from that specified client. From adding the network here, we will allow recursive DNS queries from all hosts in that network.
After we have our list of trusted DNS clients, we will want to edit the options block. Currently, the start block looks like as above.
Below the directory directive, add the showed configuration lines.

When you are finished, save and close the named.conf.options file. The above configuration specifies that only your own servers (the “trusted” ones) will be able to query your DNS server.
Next, we will configure the local file, to specify our DNS zones.
Configure Local File
Open the named.conf.local file for editing:

Aside from few comments, we will specify our forward and reverse zones.
Add the forward zone with the lines showed. Substitute the zone name with your own. In here I used amaa.com for my zone name because I’m gonna curl my apache web site which I created as www.amaa.com smallco.amaa.com
Assuming that our private subnet is 192.168.200.0/24, add the reverse zone by with the showed lines. Our reverse zone file starts with “200.168.192” which is the octet reversal of “192.168.200”:

If your servers span multiple private subnets but are in the same datacenter, be sure to specify an additional zone and zone file for each distinct subnet. When you are finished adding all of your desired zones, save and exit the named.conf.local file.
Now that our zones are specified in BIND, we need to create the corresponding forward and reverse zone files.
Create Forward Zone File
The forward zone file is where we define DNS records for forward DNS lookups. That is, when the DNS receives a name query, it will look in the forward zone file to resolve hosts’s corresponding private IP address.
According to our named.conf.local configuration that the location should be /etc/bind/zones:

After it created go to the zones file:


We will base our forward zone file on the sample db.local zone file. And we will base our reverse zone file on the sample db.127 zone file. Copy it to the proper locations with the following commands.


Now let’s edit our forward zone file:

First, you will want to edit the SOA record. Replace the first “localhost” with ns1’s fully qualified domain name, the replace “root.localhost” with “admin.amaa.com”. Also, every time you edit a zone file, you should increment the serial value before you restart the named process. We will increment it to “3” and so on. Here I edited it 8 times. That’s why here it is “10”.
Now delete the records at the end of the file (after the SOA record) and add your name server records with the following lines (replace the names with your own). NS records – name server records.
Then add the A records for your hosts that belong in this zone. This includes any server whose name we want to end with “amaa.com”. We will add A records for ns1, ns2, smallco like so.
Add CNAME record to smallco.amaa.com as www.amaa.com . When we add a CNAME record it will resolve only as www.amaa.com. Not as www.smallco.amaa.com. You will understand it later.

Save and close the db.amaa.com file.
Now let’s move onto the reverse zone file(s).
Create Reverse Zone File(s)
Edit the reverse zone file that corresponds to the reverse zone(s) defined in named.conf.local:

In the same manner as the forward zone file, you will want to edit the SOA record and increment the serial value.
Now delete the records at the end of the file (after SOA record), add your name server records with the following lins (replace the name with your own).
Then add PTR records for all your servers whose IP addresses are on the subnet of the zone file that you are editing. In here, this includes all of our hosts because they are all on the 192.168.200.0/24 subnet. Note that the first column consists of the last octet of my servers’ private IP addresses in reversed order(last two octet if we use .. . .. . .. . ../16 subnet). Be sure to substitute names and private IP addresses to match your servers.

Save and close the reverse zone file (repeat this section if you need to add more reverse zone files).
Check BIND Configuration Syntax
Run the following command to check the syntax of the named.conf* files.

If your named configuration files have no syntax errors, you will return the prompt and see no error massages. If there are problems go through the configure primary DNS server section. And retry.

The named-checkzone command can be used to check correctness of your zone files. Its first argument specifies a zone name, and the second argument specifies the corresponding zone file, which are both defined in named.conf.local

As shown below you can see there are no errors in configuration.

And to check "200.168.192.in-addr.arpa” reverse zone configuration, run the following command.

As shown below you can see there are no errors in configuration.

Restart BIND

See the syslog for errors and /etc/init.d/bind9 status for errors.

If you have the UFW firewall configured, open up access to BIND by typing:

If you are configuring the server through ssh be sure to see UFW ststus and confirm ssh rules are added. If not use sudo ufw allow ssh command.

Configure Secondary DNS Server

In most environments, it is good idea to set up a secondary DNS server that will respond to requests if the primary becomes unavailable. The secondary DNS server is much easier to sonfigure.
Edit the named.conf.options file:

At the top of the file, add the ACL with the private IP addresses of all of your trusted servers:
Below the directory directive add the lines as below.
This file should looks like ns1’s named.conf.options file except it should be configured to listen on ns2’s private IP address.

Now edit the name.conf.local file:

Define slave zones that correspond to the master zones on the primary DNS server. Type is “slave”, the file does not contain a path, and there is masters directive which should be set to the primary DNS server’s private address. If you defined multiple reverse zones in the primary DNS server, make sure to add them all here.

Run the following command to check the validity of our configuration files:


It will return the prompt if there is no errors.
Restart BIND


When BIND restarting see syslog and confirm the service restart without any errors.

Allow DNS connections to the server by altering the UFW firewall rules:


Now we have primary and secondary DNS servers for private network name and IP address resolution. Now we must configure our client servers to use our private DNS servers.
Configure DNS Clients
We must configure each clients to use ns1 and ns2 as name servers.

For clients we may need to install the utility with:

On ubuntu we can edit the resolv.conf file.

Inside the file add two name servers for our primary and secondary DNS servers as below. Add a search option pointed to the base domain of our infrastructure.

Test Clients
For example, we request a forward DNS query from primary DNS server for our apache web server using dig command.


We request a reverse DNS query from primary DNS server for our apache web server using dig -x command

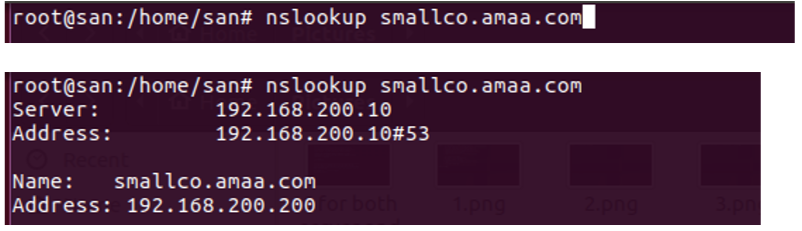
Forward nslookup:
Reverse nslookup:

Here we are querying our apache server using CNAME record that we put to the zone configuration files.

If we are using that CNAME record as following it will not resolve the DNS query

Browsing apache server

Confirm that our web server working properly using curl -G command:

When we were configuring our apache web server we put lines to /etc/network/interfaces in order to resolve curl requests.

We must remove those lines and Add Primary and Secondary DNS servers and search option to the resolv.conf file in order to check our DNS name servers are working properly.

Now confirm our web server working properly by using curl -G command again.
Browsing Apache On Client
Curl smallco.amaa.com

Curl www.amaa.com

Curl amaa.com

You can see it gives us a message could not resolve host.
Now you may refer to your servers’ private network interfaces by name, rather than by IP address. This makes configuration of services and applications easier because you no longer have to remember the private IP addresses, and files will be easier to read and understand. Also now you can change your configurations to point to a new servers in a single place, your primary DNS server, instead of having to edit a variety of distributed configuration files, which eases maintainance.
Comments