NAGIOS CONFIGURATION IN LINUX UBUNTU -16.04.3-server
- Sankalpa H.T.S
- Jul 5, 2018
- 9 min read


In this document we will cover the installation of Nagios, a very popular open source monitoring system. We will cover some basic configuration, so you will be able to monitor host via the web interface. We will also utilize the Nagios Remote Plugin Executor (NRPE), that will be installed as an agent on remote hosts, to monitor their local resources.
Nagios server – host name “nagios_server” 192.168.200.5
Host - host name “san” 192.168.200.4
We’ll start with update the server:

Install the main packages for the server:

Change the host name into nagios_server:

Reboot for apply the host name:

Here is our server:

Create Nagios User and Group
We should create a user and group that will run the Nagios process. Create a nagios user and nagcmd group, then add the user to the group.
Try to do this procedure with creating a logical volume named nagios and mount the home user directory to that logical volume. To do that refer my <how to create a logical volume> document.
Creating a password disabled user with a home directory:

Check the home folder whether that directory is created:

Creating the group:

Tail the passwd and shadow files for the created user:

Tail the group file for the created group:

Adding created user to the group we created:

Tail the group file for check the user adding to the group:

Install Build Dependencies
Because we are building Nagios Core from source, we must install a few development libraries that will allow us to complete the build. While we're at it, we will also install apache2-utils, which will be used to set up the Nagios web interface. Install the required packages:

Install Nagios Core
Download the source code for the latest stable release of Nagios Core. Go to the Nagios downloads page, and click the Skip to download link below the form. Copy the link address for the latest stable release so you can download it to your Nagios server.

Delete the unwanted address details and run the below command:

It will download as below:

Confirm that file is downloaded to the present working directory:

Extract the Nagios archive with this command:

See the extracted directory:
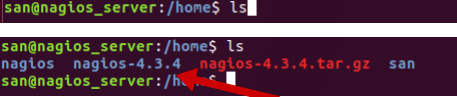
Here, that directory is in the home folder. We want to move it to the nagios user directory:

List the nagios user directory after moving the extracted directory:

Then change to the nagios user directory:

See the ownership of the extracted directory:

Change the ownership to the nagios user:

Now ownership of the extracted directory:

Then change to the extracted directory:

Before building Nagios, we must configure it:

Now compile Nagios with this command:

Now we can run these make commands to install Nagios, init scripts, and sample configuration files:

Let’s check whether the corresponding nagios.conf file is created int the /etc/apache2/sites-available/ directory:

No it didn’t. We’ll fix it later. Let’s try to restart the nagios service:

Service restart failed.

Troubleshoot the Nagios Service Restart Problem
When we see the syslog log will be empty, nothing will be showed. See service status using below command:

Go to the nagios-4.3.4 extracted directory and type the below command:

Log in to Super user mode and do followings:
Run the configure script again:

Now compile Nagios with this command:

Now we can run these make commands to install Nagios, init scripts, and sample configuration files:

Now Restart the service:

Getting same system restart fail record. So this fail record we got, not because of we did our installation without login to the super user mode.
Run these two commands to solve the system restart failure:
systemctl daemon-reload


Now restart the Nagios service:

See syslog:

We can see that now it restarted succesfully.

Let’s check now whether the corresponding nagios.conf file is created int the /etc/apache2/sitesavailable/ directory:

for created nagios.conf file run the below installation within the nagios-4.3.4 directory:

Now check the /etc/apache2/sites-available/

Now we can find the nagios.conf file there.
I’m always looking the /var/log/syslog in everytime for check error occurs that happened while within the whole configuration period. Now it shows me some errors like below:

Troubleshoot the syslog error
Go to the nagios-4.3.4 extracted directory and run the below command:

Change to the nagios user directory:

When we run configure script with make install commands it will automatically creates corresponding files and directories in the nagios user directory because of we gave --prefix=/home/nagios . We should remove all filed and directories which created as mentioned before.

Now do the above procedure start with the beginning. I’ll show you commands in order.

Run the /etc/init.d/nagios restart
I’ll show you the syslog:

Nagios service restarted succesfully.
Now let’s open the nagios.conf file which created from the installation steps we did earlier.

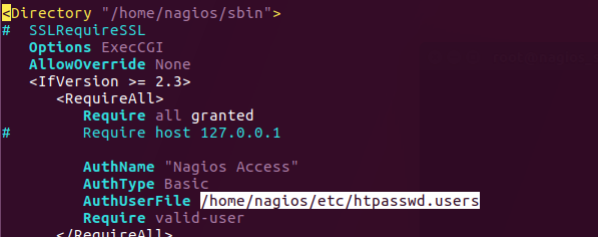
In this file there are some lines related to the older version of nagios core under the <IfVersion < 2.3> section.

Remove those lines and finally it will looks like below:

After delete those lines run the below command:

Now check the file path entered in the nagios.conf file as AuthUserFile:
Use htpasswd to create an user, called "nagios", that can access the Nagios web interface:

Enter the password for that user for web access:

Re-enter the password for that user for web access:

Now check the htpasswd file created in the correspondence command path we used:

We can find it there as below:

In order to issue external commands via the web interface to Nagios, we must add the web server user, www-data, to the nagcmd group:

Tail group file for confirm the above user added to the group nagcmd:

Let’s restart the nagios and apache2 service:

Accessing the Nagios
Web Interface Open the web browser and go to your Nagios server by substituting the IP_address/nagios in the access bar.

Because we configured Apache to use htpasswd, you must enter the login credentials that you created earlier. We used "nagios" as the username:

After gave user credentials press ok:

Our web server gives us a error message as above. According to solve this error we can tail the /var/log/apache2/error.log for find the errors.

It seems like there is not a htpasswd.users file in the /home/nagios/etc/ directory. We used htpasswd command for access the nagios web interface. In that command we used “htpasswd -c /home/nagios/etc/htpasswd nagios” as the name for the corresponding file(bold name). We can find that file as below:

Let’s open the nagios.conf file in the /etc/apache2/sites-available/ directory and change the htpasswd.users in to htpasswd in the end of the AuthUserFile path.

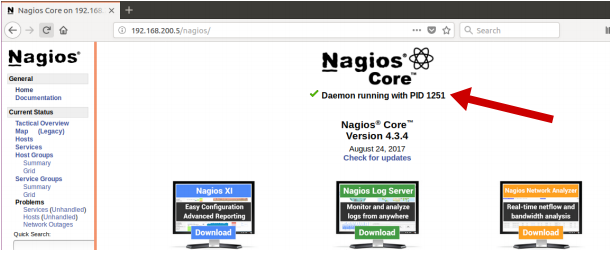
Now go to your Nagios server by substituting the IP_address/nagios in the access bar:

We can access the web, but it is not running. We will make it running later
Install Nagios Plugins
Find the latest release of Nagios Plugins: Nagios Plugins Download. Copy the link address for the latest version, and copy the link address so you can download it to your Nagios server.

Download it to your home directory with curl:

File will download as below:

Check the home directory for downloaded file:

Change to the /home/nagios/ directory:

Extract Nagios Plugins archive with this command:

Check the /home/nagios/ directory for extracted file.

Change the ownership to nagios user as follows in the extracted directory:

Then change to the extracted directory:

Before building Nagios Plugins, we must configure it. Use this command:

Now compile Nagios Plugins with this command:

Then install it with this command:

Install NRPE
Find the source code for the latest stable release of NRPE at the NRPE downloads page. Download the latest version to your Nagios server.

Download it to your home directory with curl:

File will download as below:

Change to the /home/nagios/ directory:

Extract the NRPE archive with this command:

When I try to extract NRPE it gives error message as below:

There is something wrong with the downloaded file. Let’s check the file size of the downloaded NRPE with du -sh command:

It shows the size of 4.0K .

Let’s check the file size when we try to download it directly through the internet:
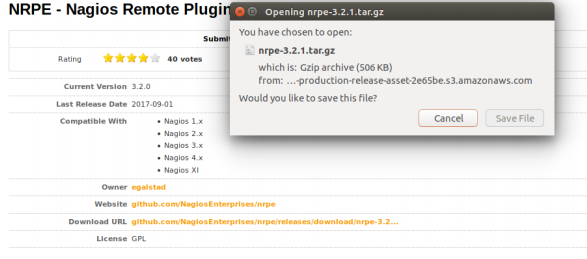
It shows the size of the file 506KB. Therefore it is a problem with downloading using curl command. Let’s remove the existing downloaded NRPE file from the server;

Confirm whether it removed:

I’m configuring nagios by ssh to the server via client machine. So that now I’m gonna download the NRPE file directly from the internet to the client machine and copy it to the server using scp command.

See Downloads directory for the downloaded file in the client machine:

Copy that file to the server using below command:

Provide the password for the root access in the server:

It is successfully copied. Let’s check in the server whether that file copied or not into the /home/ directory:

Now check the size of the file:

It has the actual size 508K. You can see it below.

Go to the nagios user directory:

Extract the NRPE archive with this command:

Then change the ownership of the extracted file as follows:

Confirm the changes:

Then change to the extracted directory:

Configure NRPE with these commands:

Now build and install NRPE and its xinetd startup script with these commands:

Open the xinetd startup script in an editor:

The file looks like as below:

Modify the only_from line by adding the private IP address of the your Nagios server to the end (substitute in the actual IP address of your server):

Save and exit. Only the Nagios server will be allowed to communicate with NRPE.
Restart the xinetd service to start NRPE:

syslog looks like this:

Xinetd restarted successfully:

Configure Nagios
Go to the /home/nagios/etc/ directory:

And open the cgi.cfg file:

When we create a user that is not named "nagiosadmin", we will need to edit /home/nagios/etc/cgi.cfg and change all the "nagiosadmin" references to the user you created. We enter our nagios user with a comma as below.


Open the Nagios contacts configuration in your text editor. We'll use vim to edit the file: Find the email directive, and replace its value with your own email address:

Delete nagios@loaclhost and enter your email. Mine sangeeth95@yahoo.com

Open nagios.cfg file in /home/nagios/etc/ directory and find the line as pointed:

And uncomment that line.

Make the corresponding servers directory in given path:

Check whether it created:

Now we’ll restart our nagios service and apache service:

Now go to the servers web interface:

Our web interface is still not running. According to run our web interface correctly we should enable the apache rewrite and cgi modules:

Now go to the nagios web interface: If it still not running reboot the machine and try go to the nagios web interface again:

Monitor a Host with NRPE
Our host machine:

In this section, I'll show you how to add a new host to Nagios, so it will be monitored. Repeat this section for each server you wish to monitor.
On a server that you want to monitor, update apt-get: I have already updated. But you may update it. Now install Nagios Plugins and NRPE:

We can check the version of the specific package by using below command:

You can see the results as below:

We can download the required package with the selected version as below:

Configure Allowed Hosts
Now, let's update the NRPE configuration file. Open it in editor ( I am using vim).

Find the allowed_hosts directive pointed above, and add the private IP address of your Nagios server to the comma-delimited list as below:

Save and exit. This configures NRPE to accept requests from your Nagios server, via its private IP address.
Configure Allowed NRPE Commands
Look up the name of your root filesystem (because it is one of the items we want to monitor):

I will be using the filesystem name in the NRPE configuration to monitor our disk usage (it is probably /dev/sda1). Now open nrpe.cfg for editing:

The NRPE configuration file is very long and full of comments. There are a few lines that you will need to find line pointed:
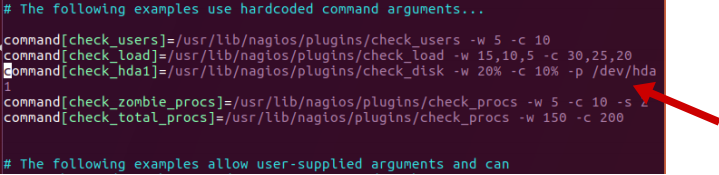
And modify root filesystem as pointed:

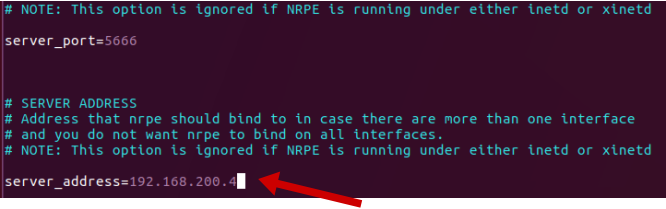
Note that there are several other "commands" defined in this file that will run if the Nagios server is configured to use them. Also note that NRPE will be listening on port 5666 because server_port=5666 is set. If you have any firewalls blocking that port, be sure to open it to your Nagios server.

Find the server_address line and Set to the private IP address of this host as pointed:

Save and quit.
Restart NRPE
Restart NRPE to put the change into effect:

Check syslog for errors:

By checking syslog we can find that nagios-nrpe-server is failed to restart:
Checking the status of nagios-nrpe-server

It says there is a configuration error in the line with host address in nrpe.cfg file.

Open that file and find the server_address line and delete the localhost IP address(127.0.0.1) and save the file.
Restart NRPE to put the change into effect: Syslog shown below:

And it will restart successfully:

Once you are done installing and configuring NRPE on the hosts that you want to monitor, you will have to add these hosts to your Nagios server configuration before it will start monitoring them.
Add Host to Nagios Configuration
On your Nagios server, create a new configuration file for each of the remote hosts that you want to monitor in /home/nagios/etc/servers/

Create a file with your hostname.cfg or any other name you want. I use amaa.cfg:

Add in the following host definition, replacing the host_name value with your remote hostname, the alias value with a description of the host, and the address value with the private IP address of the remote host:

With the configuration file above, Nagios will only monitor if the host is up or down. If this is sufficient for you, save and exit then restart Nagios.

Syslog showing:


Once you are done configuring Nagios to monitor all of your remote hosts, you should be set. Be sure to access your Nagios web interface, and check out the Services page to see all of your monitored hosts and services: Here I wasn’t monitoring services in the remote host. Therefore see the host page for check out the host we add:

Now that you monitoring your host only, But you might want to spend some time to figure out which services are critical to you, so you can start monitoring those. You may also want to set up notifications so, for example, you receive an email when your disk utilization reaches a warning or critical threshold or your main website is down, so you can resolve the situation promptly or before a problem even occurs.
References:
https://www.digitalocean.com/community/tutorials/how-to-install-nagios-4-and-monitor-your-servers-on-ubuntu-14-04


Comments